Implementing a Project - Tic-Tac-Toe
The purpose of this lesson is to learn how to implement a planned project, additionally noting things that may not have been covered in the planning to make future planning sessions potentially even more profitable. We will work through what we have and see if there is anything else to do afterwards.
Getting Started
As we already have a project from the last lesson we will continue with it in this one. Much like our first interactive project we will need display, style, and interactivity. To start, we will focus on the interactivity and run the JavaScript from the developer console. Additionally, since we made the mechanics planning documentation GitHub friendly, I will be looking at that on a secondary monitor and recommend you do the same.
Initial Scaffolding
For a quick initial scaffolding, we will copy the first interactive project files and modify them to the following. Please note that the white (blank) space may be different for the html as my computer has changed since since that lesson and a different automatic formatter is at play by default.
1<!-- index.html -->
2<!DOCTYPE html>
3<html>
4
5<head>
6 <title>Tic-Tac-Toe</title>
7 <link rel="stylesheet" href="main.css" />
8 <script src="main.js"></script>
9</head>
10
11<body>
12 <div>
13 <h1>Tic-Tac-Toe</h1>
14 <p>Please open the developer console to play at the moment</p>
15 </div>
16</body>
17
18</html>
19
1/* main.css */ 2body, 3body * { 4 margin: 0px; 5} 6div { 7 background-color: black; 8 color: white; 9} 10h1 { 11 color: lightgreen; 12} 13
1// main.js 2console.log('Welcome to the Tic-Tac-Toe console') 3
Now, we check that the initial scaffolding is doing as expected by starting the live server and checking the developer console for the message Welcome to the Tic-Tac-Toe console. With that we should push to GitHub as we now have some initial scaffolding files.
Starting The Actual Code
After re-looking at the rules and coming to the realization that each player can be represented by a character, we make our main.js file into the following.
1// main.js
2console.log('Welcome to the Tic-Tac-Toe console')
3
4// Two Player Characters
5const playerCharacters = ['X', 'O']
6
7// Current Player Character - Starts as the Starting Character
8// Will need to add ability to pick character
9let currentPlayerCharacterIndex = 0
10
11// Game Board - 3x3 Grid
12let gameBoard
13
14// Function to initialize the game board as needed
15function initializeGameBoard () {
16 gameBoard = [
17 ['', '', ''],
18 ['', '', ''],
19 ['', '', '']
20 ]
21}
22// we always want the game board to be initialized before we start
23initializeGameBoard()
24
25// a few functions to check each way for a winner
26function checkColumnForWinner (columnIndex) {
27 // will need to be all the same character
28 const playerCharacter = gameBoard[0][columnIndex]
29 if (!playerCharacter) {
30 // '' is falsy so we can check like this
31 return false
32 }
33 // scan the column in a loop
34 for (let i = 0; i < 3; i++) {
35 if (playerCharacter !== gameBoard[i][columnIndex]) {
36 return false
37 }
38 }
39 return playerCharacter
40}
41
42function checkRowForWinner (rowIndex) {
43 // will need to be all the same character
44 const playerCharacter = gameBoard[rowIndex][0]
45 if (!playerCharacter) {
46 // '' is falsy so we can check like this
47 return false
48 }
49 // scan the row in a loop
50 for (let i = 0; i < 3; i++) {
51 if (playerCharacter !== gameBoard[rowIndex][i]) {
52 return false
53 }
54 }
55 return playerCharacter
56}
57
58function checkLeftToRightTopToBottomDiagonalForWinner () {
59 // will need to be all the same character
60 const playerCharacter = gameBoard[0][0]
61 if (!playerCharacter) {
62 // '' is falsy so we can check like this
63 return false
64 }
65 // scan the diagonal in a loop
66 for (let i = 0; i < 3; i++) {
67 if (playerCharacter !== gameBoard[i][i]) {
68 return false
69 }
70 }
71 return playerCharacter
72}
73
74function checkLeftToRightBottomToTopDiagonalForWinner () {
75 // will need to be all the same character
76 const playerCharacter = gameBoard[0][2]
77 if (!playerCharacter) {
78 // '' is falsy so we can check like this
79 return false
80 }
81 // scan the diagonal in a loop
82 for (let i = 0; i < 3; i++) {
83 if (playerCharacter !== gameBoard[i][2 - i]) {
84 return false
85 }
86 }
87 return playerCharacter
88}
89
90// function to check all ways for a winner
91function checkForWinner () {
92 // check each row and column for a winner
93 for (let i = 0; i < 3; i++) {
94 const columnWinner = checkColumnForWinner(i)
95 const rowWinner = checkRowForWinner(i)
96 if (columnWinner || rowWinner) {
97 return columnWinner || rowWinner
98 }
99 }
100 // then the diagonals
101 return (
102 checkLeftToRightTopToBottomDiagonalForWinner() ||
103 checkLeftToRightBottomToTopDiagonalForWinner() ||
104 false
105 )
106}
107
108// check if there are any open spaces
109function areThereOpenSpaces () {
110 for (let i = 0; i < 3; i++) {
111 for (let j = 0; j < 3; j++) {
112 if (!gameBoard[i][j]) {
113 return true
114 }
115 }
116 }
117 return false
118}
119
120// check if we are able to make any more moves, if not the game is over
121function canMakeMove () {
122 return areThereOpenSpaces() && !checkForWinner()
123}
124
125function makeMove (rowIndex, columnIndex) {
126 // game already over
127 if (!canMakeMove()) {
128 return false
129 }
130 // space already taken
131 if (gameBoard[rowIndex][columnIndex]) {
132 return false
133 }
134 // make the move
135 gameBoard[rowIndex][columnIndex] =
136 playerCharacters[currentPlayerCharacterIndex]
137 // change player
138 currentPlayerCharacterIndex = (currentPlayerCharacterIndex + 1) % 2
139 return true
140}
141
This is enough to be able to play around in the console with the debugger open and watching the gameBoard variable to see who won. This is also written in a way to allow some major refactors (or code redesign and optimization) later. For now though, let us try playing a game in the developer console. Once you navigate to main.js, watch the gameBoard variable and expand it, your screen should look something like this.
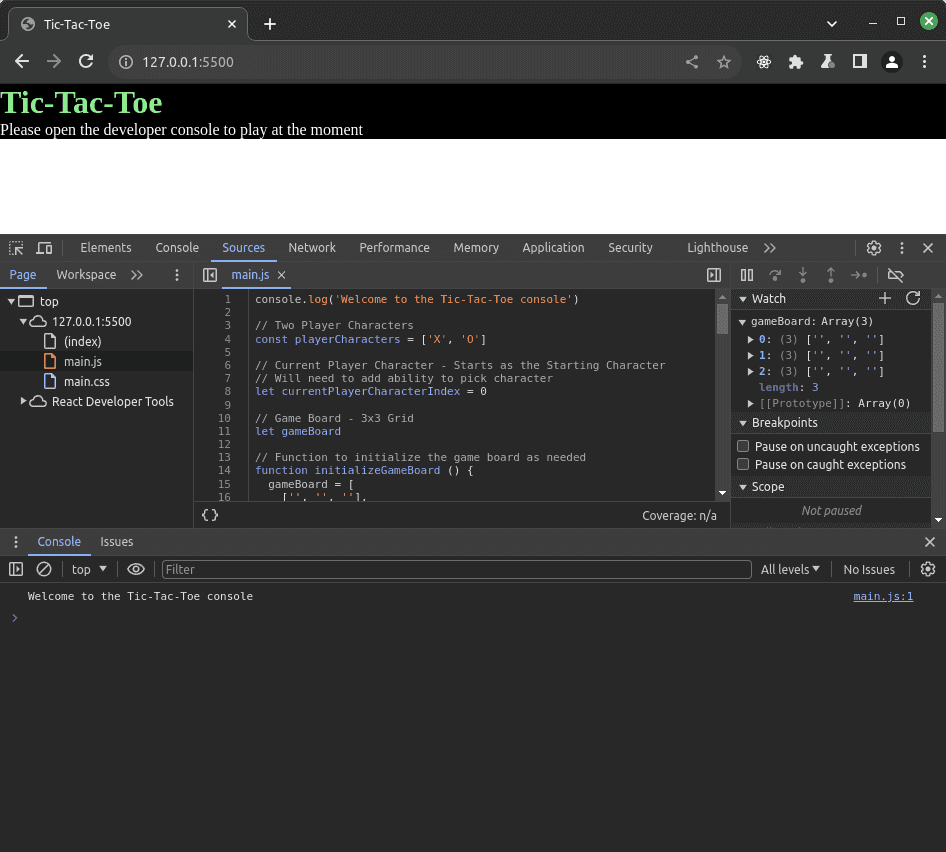
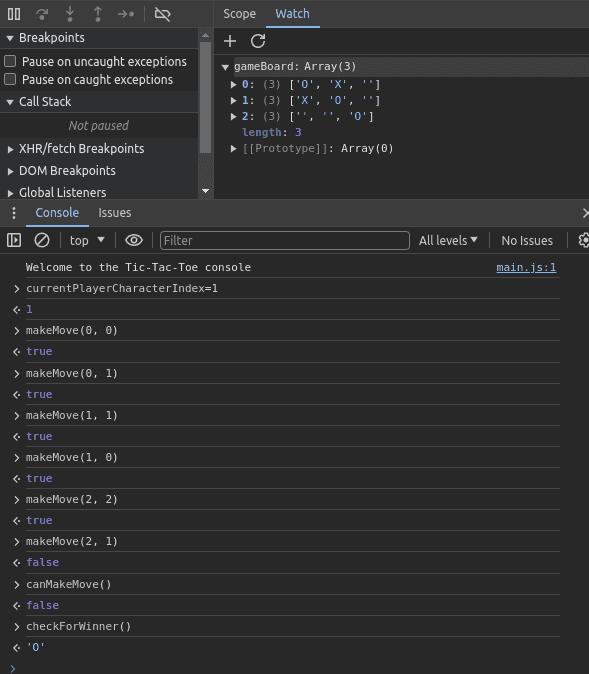
Please feel free to add breakpoints to understand bits of it more, or more watch expressions (such as playerCharacters[currentPlayerCharacterIndex]). For now, we will be doing the following commands in the console to simulate a game. To follow along fully, hit the refresh in the watch area after each command. We will have first player become O character and win the game by going diagonally down from the left corner to the right.
1// Change first player being 'O' 2currentPlayerCharacterIndex=1 3// make initial move at top left corner 4makeMove(0, 0) 5// second player to the right of that 6makeMove(0, 1) 7// first player center of grid 8makeMove(1, 1) 9// second player left of that 10makeMove(1, 0) 11// first player about to win 12makeMove(2, 2) 13// second player tries to make a move anyway 14makeMove(2, 1) 15// double check if moves are allowed 16canMakeMove() 17// check winner 18checkForWinner() 19
At this point, we should have something like this in the developer tools.
Since we have confirmed that we can manually play the game in the console, we should push to GitHub and start looking into getting this to work in a more user friendly way. Additionally, we may want to note new questions in our documentation to take a look at later and push that. Since we are in the middle of our initial implementation, I am adding to the file /docs/mechanics/README.md the following section at the bottom.
1## TODOs 2 3### Answer the following, and implement as needed 4 5- Should we have a computer opponent, or human only? 6 - How would we implement a computer opponent? 7 - Should it always force a draw or win? 8- Should we allow net play when against another human? 9 - How could this be implemented? 10- What should the final display look like? 11- What should be refactored (the code changed to be more readable or efficient)? 12
Displaying the Game Board Graphically
Now that we have played around in the console and we feel that there is something that should work, we want a way to display that graphically. Remembering one of the resources to check we find that the W3 Schools HTML Tutorial area has Tables and decide to start there. After reading through the docs, utilizing our button memories, and playing around a bit, we end up with the below.
1<!-- index.html added to body -->
2<table>
3 <tr>
4 <td><button type="button" onclick="makeMove(0, 0)">
5
6 </button></td>
7 <td><button type="button" onclick="makeMove(0, 1)">
8
9 </button></td>
10 <td><button type="button" onclick="makeMove(0, 2)">
11
12 </button></td>
13 </tr>
14 <tr>
15 <td><button type="button" onclick="makeMove(1, 0)">
16
17 </button></td>
18 <td><button type="button" onclick="makeMove(1, 1)">
19
20 </button></td>
21 <td><button type="button" onclick="makeMove(1, 2)">
22
23 </button></td>
24 </tr>
25 <tr>
26 <td><button type="button" onclick="makeMove(2, 0)">
27
28 </button></td>
29 <td><button type="button" onclick="makeMove(2, 1)">
30
31 </button></td>
32 <td><button type="button" onclick="makeMove(2, 2)">
33
34 </button></td>
35 </tr>
36 </table>
37
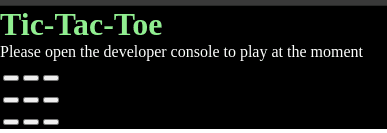
We now have a grid of nine buttons! By observing in the console, we notice that clicking them does indeed cause the gameBoard object to work as expected, but the display doesn't change and the buttons are quite tiny.
We would like the grid of buttons to display in a bit larger way, so we decide to play with the css a bit. We already know that the buttons will only have one character each, so we do add the following styling.
1/* added main.css styling */ 2button { 3 width: 1.5rem; 4 height: 1.5rem; 5 font-size: 1rem; 6} 7
Please check the W3 schools page if you want to see more about width and height, in addition to the page on units if you want to know more about what is available besides rem to specify for sizing units. For now, we wanted squares and for the squares to be bigger than a single character, and are using rem to be safer for accessibility purposes as it scales off of a user's selected font size. In general, it is considered best practice to use relative units for this reason. If you want to see how it works, you may compare results to the below by opening a new chrome tab to chrome://settings/appearance and adjusting the Font size setting. Note that the whole page adjusts with our current settings, but the buttons do not do so with the below.
1button { 2 width: 15px; 3 height: 15px; 4 font-size: 10px; 5} 6
A Quick Aside
I have worked with people who just wanted to shrink everything smaller using the pixel values, and had to explain that this could open up lawsuits in the future. Additionally, my mother likes the font super huge. Anyway, should all go as planned with this series we will eventually get to what is known as responsive design and some methods to allow more information in an easy to use manner without trying to make everything smaller. Another quick thing to realize is that different displays may have a different number of pixels per area unit (inches, centimeters, ect).
Anyway, for the learning here, we will be sticking with relative units generally, unless we are trying to clear margins or similar things that do not affect usability (0px is the best way to say no space).
For more on making a button accessible please see these docs.
Back To The Display
Now that we have buttons linked to the game board functionality, we need that functionality to let us display what is happening. We remember that was doable with button.innerText and so add the following function to our JavaScript. Note that we are picking a specific button from the table using the nth-child selector.
1// added to main.js above makeMove
2function matchDisplayBoardToGameBoard () {
3 for (let i = 0; i < 3; i++) {
4 for (let j = 0; j < 3; j++) {
5 const button = document.querySelector(
6 `table tr:nth-child(${i + 1}) td:nth-child(${j + 1}) button`
7 )
8 button.textContent = gameBoard[i][j]
9 }
10 }
11}
12
13// add just before the return true statement of makeMove
14matchDisplayBoardToGameBoard()
15
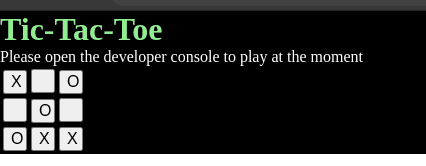
Now as we click buttons (or tab to them and tap space), the button text should fill in so long as they are usable, and we should be able to get a game to look like below through the user screen rather than the console.
However, the buttons still will fire click events and be enabled even if they are not blank. Additionally, the text isn't quite centered. So, lets add the following.
1// main.js after button.textContent = gameBoard[i][j] 2button.disabled = gameBoard[i][j] 3
1/* main.css button selector innards */
2 text-align: center;
3 padding: 0px;
4
5/* and a new selector for after the button is disabled */
6button:disabled {
7 color: white;
8 background-color: black;
9}
10
Note that it is possible to discover the extra padding (reason for the padding: 0px;) through the developer tools, and that the button:disabled styles show up when a button becomes disabled. Additionally, it makes it clear in a situation such as below that we may want to disable all the buttons once the game has a winner.
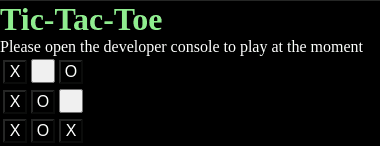
We decide to add that functionality in, by adding to the matchDisplayBoardToGameBoard the first line const gameIsOver = !canMakeMove() and updating the disabled condition to button.disabled = gameBoard[i][j] || gameIsOver (position is truthy or the game is over). Looking at the screen now on a win, we can observe a few things that we need to update and add.
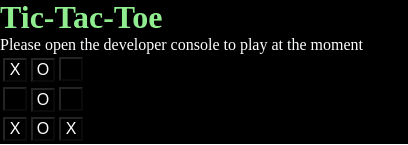
For one thing, once the game is over we still have to manually reset the game board. Additionally, we can not tell who the current player is, nor does the first player get to pick their character. Also, when the game is over we do not know if someone won or if it was a draw with the current display. Finally, since I was talking about accessibility - if someone is using the keyboard and screen reader to play then how do they know what place they are currently at with a screen reader? However, before we dig deeper into these things, let us push to GitHub.
Converting to an Accessible Grid
After digging into docs, we discover the ARIA Grid Role and decide to follow and tweak that to fit. There is a lot of useful code on the page to learn from, but for the moment we are just going to copy it into a secondary file called accessible-table-grid.js as this gives more a chance to get used to the idea of accessibility. Note that the example has been slightly modified for our own use, but basically it grabs all the table cells with the right role and gives them data to be able to navigate with the keyboard as a grid. We then make the move at the right column and row based off of that information if space or enter are pressed. More on the details of how it works right now would be self study outside of this lesson as it is an aside from the main focus of the lesson and research is a large part of practical programming.
1// accessible-table-grid
2const selectables = document.querySelectorAll('table td[role="gridcell"]')
3
4selectables[0].setAttribute('tabindex', 0)
5
6const trs = document.querySelectorAll('table tbody tr')
7let row = 0
8let col = 0
9let maxrow = trs.length - 1
10let maxcol = 0
11
12trs.forEach(gridrow => {
13 gridrow.querySelectorAll('td').forEach(el => {
14 el.dataset.row = row
15 el.dataset.col = col
16 el.ariaColIndex = col + 1
17 el.ariaRowIndex = row + 1
18 el.ariaLabel = `Row ${row + 1}, Column ${col + 1} - Not Yet Played`
19 col++
20 })
21 if (col > maxcol) {
22 maxcol = col - 1
23 }
24 col = 0
25 row++
26})
27
28function moveto (newrow, newcol) {
29 const tgt = document.querySelector(
30 `[data-row="${newrow}"][data-col="${newcol}"]`
31 )
32 if (tgt?.getAttribute('role') === 'gridcell') {
33 document.querySelectorAll('[role=gridcell]').forEach(el => {
34 el.setAttribute('tabindex', '-1')
35 })
36 tgt.setAttribute('tabindex', '0')
37 tgt.focus()
38 return true
39 } else {
40 return false
41 }
42}
43
44document.querySelector('table').addEventListener('keydown', event => {
45 const col = parseInt(event.target.dataset.col, 10)
46 const row = parseInt(event.target.dataset.row, 10)
47 switch (event.key) {
48 case 'ArrowRight': {
49 const newrow = col === 6 ? row + 1 : row
50 const newcol = col === 6 ? 0 : col + 1
51 moveto(newrow, newcol)
52 break
53 }
54 case 'ArrowLeft': {
55 const newrow = col === 0 ? row - 1 : row
56 const newcol = col === 0 ? 6 : col - 1
57 moveto(newrow, newcol)
58 break
59 }
60 case 'ArrowDown':
61 moveto(row + 1, col)
62 break
63 case 'ArrowUp':
64 moveto(row - 1, col)
65 break
66 case 'Home': {
67 if (event.ctrlKey) {
68 let i = 0
69 let result
70 do {
71 let j = 0
72 do {
73 result = moveto(i, j)
74 j++
75 } while (!result)
76 i++
77 } while (!result)
78 } else {
79 moveto(row, 0)
80 }
81 break
82 }
83 case 'End': {
84 if (event.ctrlKey) {
85 let i = maxrow
86 let result
87 do {
88 let j = maxcol
89 do {
90 result = moveto(i, j)
91 j--
92 } while (!result)
93 i--
94 } while (!result)
95 } else {
96 moveto(
97 row,
98 document.querySelector(
99 `[data-row="${event.target.dataset.row}"]:last-of-type`
100 ).dataset.col
101 )
102 }
103 break
104 }
105 case 'PageUp': {
106 let i = 0
107 let result
108 do {
109 result = moveto(i, col)
110 i++
111 } while (!result)
112 break
113 }
114 case 'PageDown': {
115 let i = maxrow
116 let result
117 do {
118 result = moveto(i, col)
119 i--
120 } while (!result)
121 break
122 }
123 case 'Enter':
124 case ' ': {
125 makeMove(row, col)
126 break
127 }
128 }
129 event.preventDefault()
130})
131
132
For the final touches, we will need to update our main.js function matchDisplayBoardToGameBoard by adding to the inner loop (j) the following lines.
1button.parentElement.ariaLabel = `Row ${i + 1}, Column ${j + 1} - ${
2 gameBoard[i][j] || 'Not Yet Played'
3 }`
4
Note that in this context the or operand (||) will return the truthy value of Not Yet Played if the position is falsy. Additionally, it might be a good idea to consider making the phonetic words for X and O for sounding correct depending upon the screen reader used. This would be a good area to self explore if so desired.
Finally, we need the script to load after the HTML, and the HTML to have the proper roles, so we update index.html to the following.
1<!DOCTYPE html> 2<html> 3 4<head> 5 <title>Tic-Tac-Toe</title> 6 <link rel="stylesheet" href="main.css" /> 7 <script src="main.js"></script> 8</head> 9 10<body> 11 <div> 12 <h1>Tic-Tac-Toe</h1> 13 <p>Please open the developer console to play at the moment</p> 14 <table role="grid"> 15 <tr role="row"> 16 <td role="gridcell"><button type="button" onclick="makeMove(0, 0)"> 17 18 </button></td> 19 <td role="gridcell"><button type="button" onclick="makeMove(0, 1)"> 20 21 </button></td> 22 <td role="gridcell"><button type="button" onclick="makeMove(0, 2)"> 23 24 </button></td> 25 </tr> 26 <tr role="row"> 27 <td role="gridcell"><button type="button" onclick="makeMove(1, 0)"> 28 29 </button></td> 30 <td role="gridcell"><button type="button" onclick="makeMove(1, 1)"> 31 32 </button></td> 33 <td role="gridcell"><button type="button" onclick="makeMove(1, 2)"> 34 35 </button></td> 36 </tr> 37 <tr role="row"> 38 <td role="gridcell"><button type="button" onclick="makeMove(2, 0)"> 39 40 </button></td> 41 <td role="gridcell"><button type="button" onclick="makeMove(2, 1)"> 42 43 </button></td> 44 <td role="gridcell"><button type="button" onclick="makeMove(2, 2)"> 45 46 </button></td> 47 </tr> 48 </table> 49 </div> 50 <script src="accessible-table-grid.js"></script> 51</body> 52 53</html> 54
After playing with it a bit to confirm it seems to work, we decide to push to GitHub.
Reset The Game Board Button
Let's add a New Game Button below the board, and make a function to do the initialization for that character.
1<!-- index.html below table -->
2<button onclick="newGame()">New Game</button>
3
1// bottom of main.js
2
3function newGame() {
4 initializeGameBoard()
5 currentPlayerCharacterIndex = 0
6 matchDisplayBoardToGameBoard()
7}
8
Oh no! Our button is too small for the text!

Fortunately, we can fix it by making our css selector for the buttons we want as squares only be in the table, instead of anywhere as they are right now by changing from button to table button in main.css. This increases the selector specificity slightly for our use case, so we do not have to worry about adding classes yet and can save that for a later lesson.
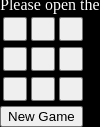
Let us push to GitHub with this fix.
Visible Current Player
Next, we want to add a visible current player. At the moment, we have a paragraph that is talking about needing the developer console - something that is true no longer. Though it is our only paragraph, let us change it up to look like the following.
1<p id="playerTurn"></p>
2
And in the main.js, let us make it update right away.
1// main.js somewhere
2function displayPlayerTurn () {
3 const playerTurnElement = document.getElementById('playerTurn')
4 playerTurnElement.textContent = `Current Player: ${playerCharacters[currentPlayerCharacterIndex]}`
5}
6displayPlayerTurn()
7
And we now are getting an error since we load the script before the rest of the HTML since we need parts of the HTML available on the loading of the script. So, let us move the script tag to just above the closing body tag so that the rest of the page has loaded already.
1<!-- index.html -->
2 <script src="main.js"></script>
3</body>
4
Additionally, we will want to have it change after each move, so lets add displayPlayerTurn to the end of makeMove.
1// main.js 2matchDisplayBoardToGameBoard() 3displayPlayerTurn() 4return true 5
First Player Picks Character
The first player should choose their character at the start of the game. For the moment, we are going to use a confirmation dialog to do so, and can explore other options when doing a refactor later. As such, we will update the newGame function and remove some code we had outside of it that is now in it.
1// remove these calls that are not inside of functions
2// initializeGameBoard()
3// displayPlayerTurn()
4
5
6function newGame () {
7 initializeGameBoard()
8 if (confirm('First Player Should Be X - Cancel for O')) {
9 currentPlayerCharacterIndex = 0
10 } else {
11 currentPlayerCharacterIndex = 1
12 }
13 displayPlayerTurn()
14 matchDisplayBoardToGameBoard()
15}
16// newGame takes care of the removed functions
17newGame()
18
Game End - Winner or Draw
We already have the pieces in place to check if the game is over at the end of a turn, so lets add them. We will co-opt the displayPlayerTurn function to do this.
1function displayPlayerTurn () {
2 const playerTurnElement = document.getElementById('playerTurn')
3 playerTurnElement.textContent = `Current Player: ${playerCharacters[currentPlayerCharacterIndex]}`
4 const gameIsOver = !canMakeMove()
5 if (gameIsOver) {
6 const winner = checkForWinner()
7 if (winner) {
8 playerTurnElement.textContent = `Winner: ${winner}`
9 } else {
10 playerTurnElement.textContent = 'Tie Game'
11 }
12 }
13}
14
Playing with it a bit, things seem to be working so now we should push to GitHub again.
Checking against the plans again
We want to double check everything against our original plans once again. The rules we had were the following.
- This game has two players.
- Either player may start the game.
- Starting player may choose X or O character to represent their chosen positions.
- Non-Starting Player gets the character not chosen by the Starting Player.
- The game is played on a 3x3 grid for a total of nine positions.
- Players take turns.
- A turn consists of choosing one open position.
- The game is over when any of the following is true:
- There are no more open positions.
- A player has won at the end of their turn.
- A player has won through having three positions occupied in a row either diagonally or orthogonally.
- The game is a draw if there are no more open positions, and no player has won.
Everything in the rules is true, assuming that players are sitting at the same computer. Should that not be the case, Rule 2 - Either player may start the game, has the possibility of not being fulfilled. So, we decide to note that in our docs/mechanics/README.md TODOs by adding the following question: - Does it count as either player starting in the status that it is currently in?
Then, we double check against the core-loop and determine that this appears to work as outlined.
Since we edited, we should once again push to GitHub.
Conclusion
At this point, we have thrown some code out there that meets the initial requirements, but also have some more questions to delve into. Additionally, we have learned about tables and a bit about why accessibility is important, and seen practical examples of pulling things from the docs. Finally, we have set up some code that is not ideal in order to have something to refactor next time as a regular part of the software development lifecycle. You may view the current code on GitHub or StackBlitz.
Next - Refactoring a Project - Tic-Tac-Toe
Prior - Planning a Project - Tic-Tac-Toe
Tags: Practical Programming, Tic-Tac-Toe, JavaScript, Table, HTML, CSS, Accessibility