Web Page Interactive Button Code Investigation Continued
The purpose of this article is to continue learning is happening with the button we created now that we have learned some basic JavaScript Concepts. We will do so through piece by piece through the Chrome Dev tools, and some explanation.
Code to be Investigated
The codebase is the same that we have been working with, as seen below.
1console.log('abc')
2
3// clickedTimes is to keep track of how many times the button has been clicked
4let clickedTimes = 0
5/**
6 * This function is meant to be called on the click of the button.
7 *
8 * It serves as an example function to show a few things.
9 */
10function onButtonClick() {
11 // increment the times clicked by one, as it was just clicked
12 clickedTimes = clickedTimes + 1
13
14 // grab all of the buttons on the page
15 const buttons = document.getElementsByTagName('button')
16
17 // get just the inner button
18 const button = buttons[0]
19
20 // change the button text
21 button.innerText = `Clicked ${clickedTimes} times!`
22
23 // get some items using a different way
24 const listItems = document.querySelectorAll('li:nth-child(2)')
25
26 // iterate through each of the items selected
27 listItems.forEach(listItem => {
28 // check if the color of the text is red
29 if (listItem.style.color === 'red') {
30 // make the text of the color blue
31 listItem.style.color = 'blue'
32 } else {
33 // make the text color red for that item
34 listItem.style.color = 'red'
35 }
36 })
37}
38
Getting Started
If you are just coming back, you should start the live server and then the Chrome DevTools. Also, you should add a breakpoint to line 12 - clickedTimes = clickedTimes + 1
Piece by Piece
We will go over the code one piece at a time.
console.log('abc')
We have already noticed that this line of code makes "abc" appear on our console tab in the DevTools - but now we have the knowledge to search for why. We learned a little about scoping last time, can observe that object console here must be a global object since we did not create it. We can confirm this by typing in window.console in the console screen, and seeing some information about it. In the browser, everything that is scoped globally is part of the root window object

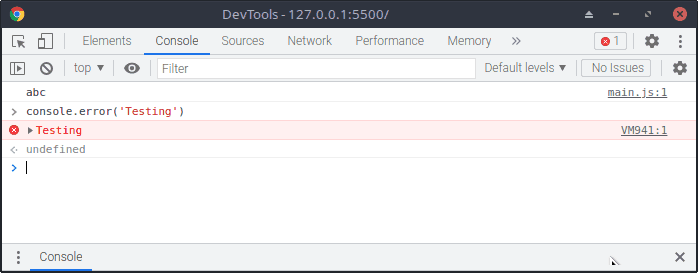
We can also do a search for "JavaScript console" to find the MDN Documentation and get more details. Basically, the console is designed for helping to debug what you are creating, or to run random code. You may want to try a few of the other functions you see there to test it out. For instance, if you run console.error('Testing') you will see something like the following.

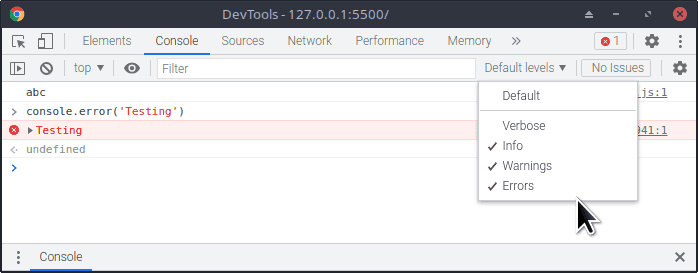
This made a red circled x, and came out in a different color. When something goes wrong, this helps it to stand out. Also, you can see that it has made that same symbol in an outlined box in the upper right. Additionally the menu currently saying 'Default Levels' can be used in conjunction with this to only look for specific information levels.

let clickedTimes = 0
With what we learned, we now know that this is a variable with a number available. We are declaring it as something that can be changed by using the let keyword, and giving the name clickedTimes to it for a reference later, with an initial value of 0.
function onButtonClick () {
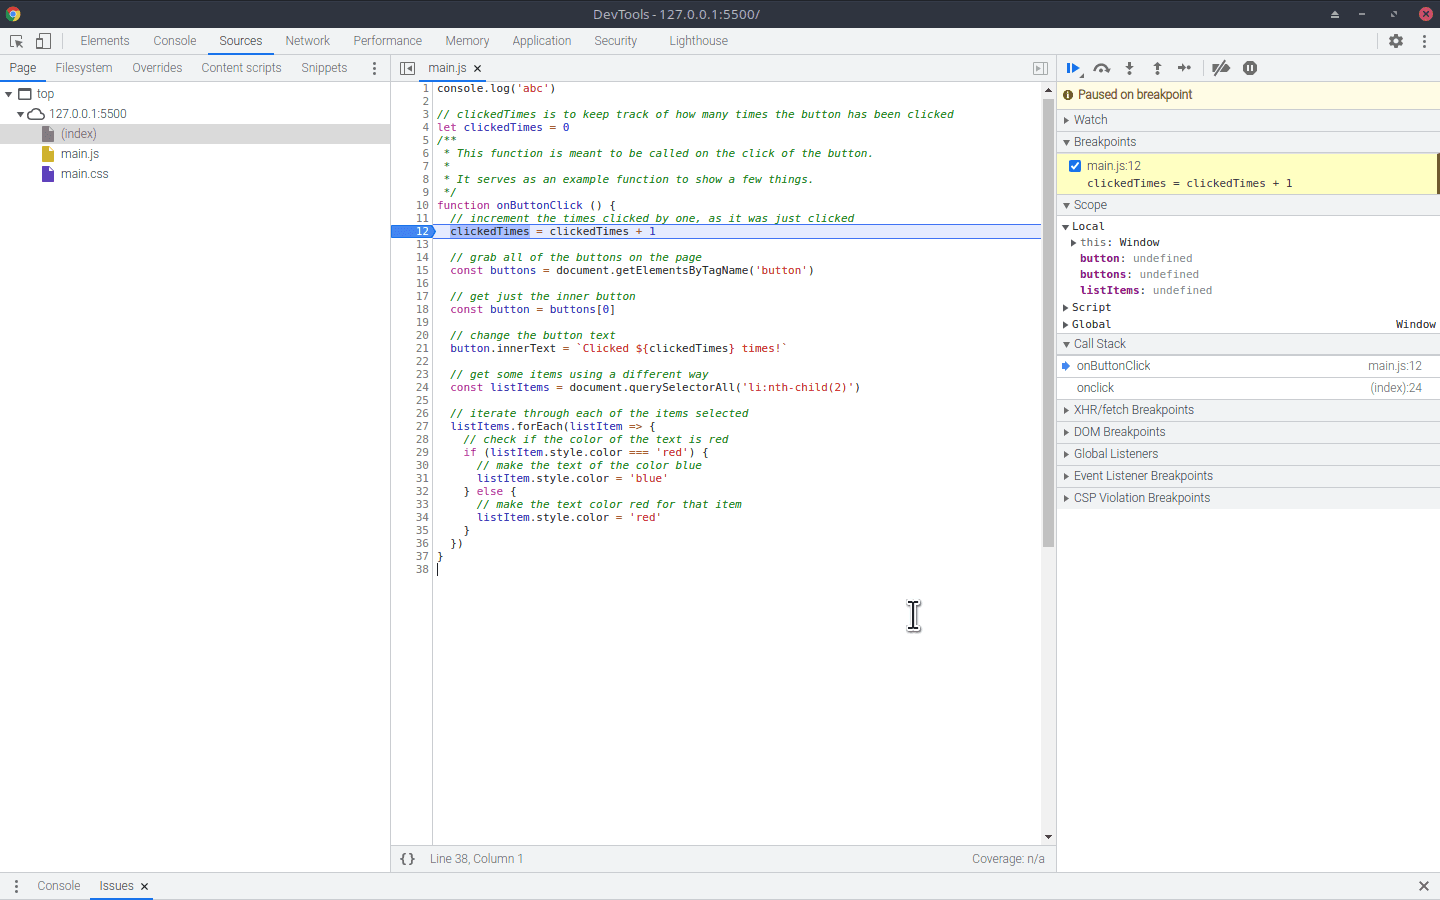
Here we are declaring a function named onButtonClick which has no arguments and has attached itself to the global scope (it can be seen on the window object). It ends at the final closing bracket } in this code. The remainder of this code takes place only when the button on the page is clicked, calling this function, as it is enclosed within those brackets. Before continuing, please click the button on the page in order to activate the breakpoint you added to the next line. At this point, we are going to start following along in the debugger. After clicking, it should look similar to below.

clickedTimes = clickedTimes + 1
This adds one to the clickedTimes variable by assigning it to itself in addition to the value 1. We saw this with our debugging a few lessons ago, but now know that it is because of the = and + operators. At this point, we can see by expanding the Script scope that clickedTimes is at its initial value before going to the next line.

We can also open up the Watch section of the tools in order to add clickedTimes and see it increment. Also, we can add buttons at this time, though it does not yet exist. To add, simply click the + button and put in the code you want to see, much like the console but it will automatically update as you step through the code.


const buttons = document.getElementsByTagName('button')
We see that this line of code is used to create a variable named buttons that cannot be changed because of the const keyword, by calling a function on document named getElementsByTagName with the argument 'button' - a string. In the Global section of the Scope area we can see that document exists and has a lot of properties. We can see more about this function on the MDN Docs, but can also infer from the name and what happens when we go to the next line what it is doing.
Thus far, we have just been clicking the blue play button to go from breakpoint to breakpoint in the debugger, but now we will go function by function - a bit deeper than line by line as we will later see. To do so we will start with the step into button. It looks like an arrow pointing down towards a dot. You may also use the key f11 if you want.

This moves us to the next line of code, where buttons is declared. However, it has yet to happen, so we still see buttons as undefined. We could add the expression document.getElementsByTagName('button') to the watch list if we want to see what it should give us. To see the results of the function, you may either move to the next line and investigate the value of buttons or put the expression in and investigate now. Either way, you will see that it is a collection that grabbed all of the (one in this example) HTML nodes tagged buttons on the page.

You may hover over the tag to see it highlighted on your page if you like. You may also watch the function with the argument 'li' to get a larger collection if you want to.
const button = buttons[0]
This line extracts the first (as it is a zero-indexed array) value from buttons for us, to make it easier to work with. It assigns the variable button to the value at key 0 of buttons. As collections and arrays start at 0 and go up, we know we have the first (and in this case only) button on the page.
button.innerText = `Clicked ${clickedTimes} times!`
As we continue going to the next lines, we see this line. Before going past it, we notice we are assigning a property on button directly and as such want to check the current value. By adding it to the watch window, we can see that button.innerText is currently "This Button Has Not Been Clicked". Looking at what we are assigning it to, we can see that we are adding a string, but that it is using backticks and a variable. Put into the watch window the expression `Clicked ${clickedTimes} times!` gives us the value "Clicked 1 times!" - not what the string is directly. This is because using backticks for a string actually makes it a string template literal. These allow you to create a string directly using other JavaScript expressions or variables through a ${expression goes here} format in the middle of the template.
As you move on from this line, notice that the button text updates as soon as you are on the next line.
const listItems = document.querySelectorAll('li:nth-child(2)')
This we see is another collection of elements, and looking at the docs we see that it is very similar to the code we used to get the buttons, but instead must use CSS Selectors, which until now we have only used in CSS. In a later lesson, we will go into these more, but at the moment this one is used to get the second child element with the tag li - for our example there are two of them, one in each list.
listItems.forEach(listItem => {
In this line, we are doing a few things. First of all, we are using the array/collection function forEach which basically calls a function for every element in the collection. Secondly, we are actually creating and declaring an unnamed function to pass in as the argument to the forEach function. This particular way of making a function is called an arrow function expression, and is used very often in modern JavaScript. We could have written this code the following way instead.
1const colorSwapper = listItem => {
2 // check if the color of the text is red
3 if (listItem.style.color === 'red') {
4 // make the text of the color blue
5 listItem.style.color = 'blue'
6 } else {
7 // make the text color red for that item
8 listItem.style.color = 'red'
9 }
10}
11
12listItems.forEach(colorSwapper)
13
In later lessons we will learn a bit of why this became more used in modern JavaScript once available, but for now just know there are a few ways to make a function. We are iterating through the list - gaining access to each element in the list through the argument variable listItem and passing it to a function. Please click the step into button again.
if (listItem.style.color === 'red') {
Here, we are checking if the boolean expression listed between the parenthesis listItem.style.color === 'red' evaluates to truthy or falsy. You may plug it into your watch list to see. The keyword if is used here to say enter this set of brackets if the expression in the parenthesis is truthy.
listItem.style.color = 'blue'
This statement is being skipped this time, because of the value being falsy. If you click the button again after making it through the first time through, you will go into this statement instead.
We have made it into the if statement because of a truthy value, and now are updating the style property's color property to become the string 'blue'. If you click step into here you will go to the end of the function (}) line).
} else {
This piece of code is closing what to do if the if expression earlier evaluated to truthy, while at the same time saying do what happens in the next set of brackets instead.
listItem.style.color = 'red'
We have made it into the else section because of a falsy value, and now are updating the style properties color property to become the string 'red'. This is where you should be the first time through the function, as well as every second time after that. If you click step into here you will go to the end of the function (}) line).
}
Ends the code to execute for the else section.
})
Ends the code for the function that we are iterating through, as well as the forEach function call.
}
Ends the function onButtonClick
<button type="button" onclick="onButtonClick()">
If you continue to click the step into button, you will end up in the HTML onclick calling the onButtonClick() method, and eventually into VM code that is not helpful, so you may click the blue play button to escape the debugging.
Conclusion
In this lesson we have went into detail on what each line does, as well as how to use the debugger to look at each line individually. While we did not learn what the other step buttons do, we got used to using the step into button to see what happens. We also learned how to use the watch feature of the DevTools. We also have been getting into the habit of looking at the docs when we need to learn more, or investigating what happens on our own.
Next - Planning a Project - Tic-Tac-Toe
Prior - Some Basic JavaScript Concepts
Tags: Practical Programming, JavaScript, Button, Interactive, Debugging